Introduction to FlowModeler
Overview
The intention of this tutorial is to provide a very basic overview for new users.
In this Tutorial you will learn
- how to start FlowModeler
- how to navigate the Startup-Page
- how to interact with a loaded Project
Open a new FlowModeler Instance
First start FlowModeler by one of the following two ways:
- via the link in the desktop menu
- via a terminal with the
flowmodeler command
The Startup-Page
After startup FlowModeler shows the following window with the startup-page:
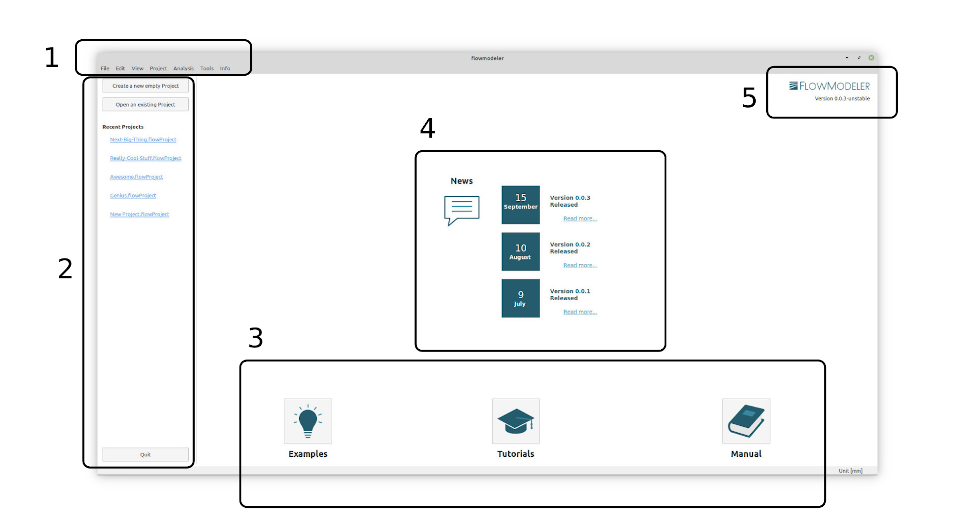
This contains the following elements:
- Menubar: Provides access to the entire functionality of FlowModeler.
- Project Navigator: Allows to create a new Project or open an existing Project. Also lists the last Projects from previous sessions.
- Quicklinks: Quick access to online Examples, online Tutorials and the User Manual.
- News: The most recent News loaded from the FlowModeler website.
- Current Version: The current version of FlowModeler running on this Machine.
This page is shown every time when no Project is loaded in FlowModeler.
Open a Project
Please download the Box.flowProject attached to this tutorial and open the file with FlowModeler either by navigating to File/Open in the Menubar or by clicking on the Open an existing Project in the Project Navigator.
FlowModeler will then change its layout to the Project-Editing-Page.
The Project-Editing-Page
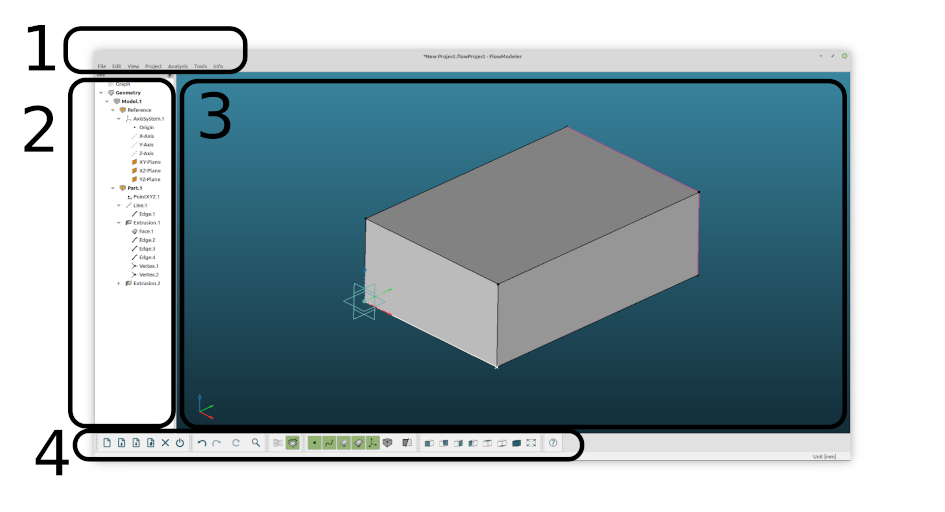
The Project-Editing-Page contains the following elements:
- Menubar: Access to the entire functionality of FlowModeler
- Tree: Access to all objects in the current Project. Allows to order and group objects.
- 3D-Viewer: Visualization and manipulation of the current Project objects.
- Toolbars: Quick access to some of the functionality provided by the Menubar.
Interaction with the Tree
The Tree contains all the objects in a Project. Objects can be edited by a Left-Mouse-Button-Double-Click, ordered by Drag&Drop and further functionality can be accessed through a context menu whicht can be shown with a Right-Mouse-Button-Cick.
Interaction with the 3D-Viewer
The 3D-Viewer shows the Geometry of the Project. The view can be modified with the mouse in the following ways:
- Left-Mouse-Button: Select the highlighted object with single click. Edit the highlighted object with double-click. Deselect all objects when no object is highlighted.
- Left-Mouse-Button + CTRL: Add the highlighted object to the current selection. Remove the selection from the highlighted object if already selected.
- Middle-Mouse-Button: Center the view at the position of the mouse-pointer.
- Right-Mouse-Button: Show the Context menu of the highlighted object. Show the Menu of the current mode when no object is highlighted.
- Middle-Mouse-Button + Mouse-Motion: Rotate the view around the current center position. The center can be defined with Middle-Mouse-Button click (see above).
- Right-Mouse-Button + Mouse-Motion: Pan the view in the plane of the screen.
- Mousewheel or Middle- + Right-Mouse-Button + Mouse-Motion: Zoom the view towards or away from the current center position.
Conclusion
That's it for this first introduction. Feel free to explore further functionality of FlowModeler on your own, continue by reading another tutorial or by reading the usermanual.
Downloads